 |
| Moonlit scene, Laurel Hill Cemetery, Philadelphia |
I
thought that might get your attention! I’m actually referring to the photographic technique, "painting with light." Over the years, I’ve toyed with the idea of going into a cemetery at night to take time exposure photographs of statues and monuments, illuminating them solely with a flashlight. The idea is to essentially photograph the darkness, while gradually illuminating the object by “painting” it with a flashlight beam. The only real gear you need is an SLR camera, tripod, and flashlight. Oh, and a cemetery at night.
That last issue was resolved for me last month when my friend Frank, who works at
Historic Laurel Cemetery in Philadelphia, suggested getting a group of photographers together for a full moon shoot on the grounds.
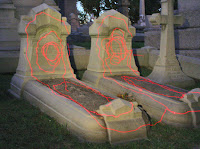
Before I went, I could have read up on painting with light techniques, but as is my nature, I prefer to learn from my own mistakes. At the time, a laser pointer seemed like a cool idea – you know, outlining the statue, drawing fine designs. Well, as you can see from this image at right, such technique requires much practice! And since I have the patience of a gnat, I’d be better off next time just illuminating the entire statue with a broad flashlight beam, like my friend Zen Bojczuk did with this image below.
Before I get all technical on you, let me share some images with you from Zen Bojczuk’s Facebook album from that evening's shoot, "
Graveyard Shift."
(His gear and settings: Camera: Pentax K10D;
Lens:
Pentax 18-55 at F8 - F11;
ISO 100). Also, being in a graveyard at night is a bit unsettling, even if you are there with a group of people. We all sort of wandered off in different directions as we waited for the full moon to appear (hoping of course, that it would not be accompanied by werewolves). I chose to make some photographs behind Millionaire’s Row, the hillside stretch of fancy Gilded Age mausoleums. Peering into the rear windows of these buildings (like the one at the top of this article) at night is enough to give you the willies – and it certainly doesn’t calm your nerves when you scare a bunch of bats off their roost in a nearby tree!
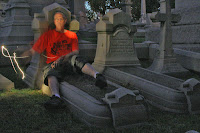
While we all waited for it to get dark enough to start our light painting, I played around with ghost images of myself (long shutter speed, hit the self-timer, then run over and get in the scene).
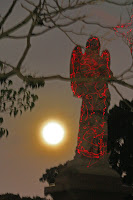
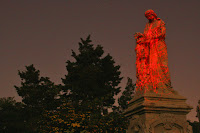
Other photographers like Frank were somewhat more productive, making wonderful moonlit images like the one above.
(His gear and settings: Camera: Nikon D90; Lens: AF-S Nikkor 18-105mm f3.5-5.6G;
ISO 400; 30 - 40 second exposures). About 10 o’clock the full moon seemed to just appear. Since I didn’t know exactly where it would be, it was difficult to plan on what statues to photograph. You can photograph them lit by the moon itself, but that’s not really what I wanted. If the scene is evenly lit, albeit dimly, your camera will just compensate for the low light and provide you with a best possible exposure, which will probably just look like a very grainy daylight photograph. When you paint with light, you illuminate a specific object or objects, while everything around it will be dark (unless lit by other sources, e.g. street lights). The moon itself is best used as a compositional element, a point light source to add interest to your scene.
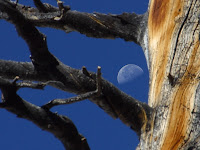
Shooting the Moon
When you look at my photo at left, why is the moon just a bright ball of light? Shouldn’t a rising moon (think wolf moon or harvest moon) be big and yellow, allowing you to see its crater details? You’ve seen the photos − a properly-exposed moon rising above a dim landscape like the one below. Well guess what? Such photographs are impossible to take. They are all doctored!
 |
| Yosemite Moon stock photo (ref) |
They’re either double exposures (two separate images sandwiched together) or Photoshopped to dim down the bright moon and/or boost the brightness of the landscape (this is the principle behind HDR, High Dynamic Range, which essentially evens out the range of an image’s brightness extremes). If you’re a photographer, you know you can’t have a properly-exposed bright object and a properly-exposed dim object in the same image. Photography doesn’t work that way. Neither do your eyes, by the way. Your brain compensates for such differences in brightness almost immediately, making you THINK you see everything with even brightness. Consider those times you’re driving and are blinded by the headlights of an oncoming car – overpowers your ability to see anything else, doesn’t it? Well, that’s how a camera reacts to exposing for a bright moon – all other dimmer detail is lost.
What Camera Should You Use when Painting with Light?
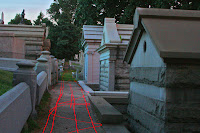
While you can hypothetically set a point-and-shoot digital to make a 60-second exposure, its image sensor is not very light sensitive. This will result in grainy, mottled images. You’d have much better results with a DSLR, whose larger image sensor is much more light sensitive. (A film SLR will work fine too, only you won’t see your images immediately). Put the camera on a tripod and lock the shutter up or set the shutter speed to ‘B’ (shutter stays open as long as the shutter release is held), bathe the statue with your flashlight beam, then close the shutter. Of course to do this, you need a cable release or remote for the shutter – you can’t hold your finger on the shutter release for a minute because you’ll move the camera. You need the camera to be perfectly still during the exposure. Since I forgot my shutter release cable, I used the camera’s self-timer to initiate the exposure. The image above was made with a thirty-second exposure, which gave me time to trace the walkway with my laser. The weird colors are a result of ambient skylight and my camera's image sensor misbehaving in its non-linear region (different image sensors will respond differently to low light situations). My gear, by the way, is a Canon Rebel XT DSLR with a Canon 28 -135mm lens. I shot at ISO 1600, which in retrospect, was a mistake. I should have used a lower light sensitivity, which would've underexposed the ambient-lit parts of the scene.
Exposure Settings
A reasonable point at which to start your experimentation is the "Auto" mode on your camera, though your results will vary widely from one camera to the next. In my book,
Digital Photography for the Impatient, I refer to the prime determinants of a successful photograph (besides composition, which only the photographer can control) as
LAFS –
Light sensitivity (ISO),
Aperture,
Focus, and
Shutter speed. Outside in the sun, you can usually set your camera on ‘Auto’ and let it make all these adjustments for you. However, for painting with light, the ‘Auto’ setting probably won’t work that well. LAFS are critical when making photographs in low-light conditions, so it makes sense to know how to adjust all of them. You might even want to experiment with all manual settings, though I prefer to use aperture-priority. Let’s look at each of the settings individually.
Light Sensitivity (ISO)
You would think that to achieve a properly exposed image you’d want your ISO cranked to max in a situation where the light is extremely dim. Not so fast, 60-Wattson..You really
don't want a
properly-exposed image, you want the background to be black, and the subject to be well-lit. You’re being very selective here. Think about shooting fireworks – you really just want to record light trails on a black sky, right? You don’t want the sky to be “properly exposed.” So you really don’t want an ISO of 1600 or higher. Try ISO 400, like Frank did for the image shown here, or even ISO 100 like Zen Bojczuk uses! Seems counter-intuitive, doesn't it? But it works.
Aperture
This one’s a bit tricky. You would think shallow depth of field, wide open aperture, right? After all, You don’t need anything in front of or behind the statue to be in focus, just the statue itself. Also, a wide open aperture (f-stop) would allow your lens to gather more light. Ah, but this works against you. You actually want a small, closed-down aperture for two reasons. One, exposure time should be at least half a minute allowing you time to paint the object – a small aperture will force this (small aperture requires longer shutter speed). Two, a small aperture will allow your lens focus to be more forgiving. What do I mean by that? Read on!
Focus
Ever try to focus in the dark? Not so easy, is it? Automated cameras have different ways of doing this, and some focus better than others. Some focus ultrasonically or with an infrared beam, invisible methods which could conceivably give you a properly focused image. Others use a burst of the camera’s own on-board flash to illuminate the object, allowing the lens’ optical focusing system to make the necessary adjustment. You can also manually focus your lens by pacing off the approximate camera-to-monument distance then rotating your lens barrel to that distance (its handy to have a small flashlight to assist you in this process!). I actually had to manually focus because one of the people in our group had epilepsy, and an attack can sometimes be triggered by strobed light.
What I plan to do on my next light-painting expedition is bring a bright flashlight to illuminate the statue while I allow my camera to auto-focus on it. Then I'll turn the auto-focus to manual, locked at that proper focus, and start taking pictures. Another practical tip for manually focusing in the dark: after you estimate the distance the best you can, shoot at a small aperture (i.e., a high f-stop). The smaller the aperture, the greater your depth of field – which means that there will be more things in focus around your set focus point. A wide angle lens also works to your focus advantage – a 28mm lens inherently has greater depth of field than a 50mm or longer lens, for example.
Shutter Speed
 |
| Lasered statue |
Shutter speed, or your exposure time, needs to be long enough for you to paint the tombstone, statue, or monument. Generally, this might need to be 15 seconds or more, depending on how wide a swath of light your flashlight provides and how large the statue is. My shutter speed for the image shown here was about forty seconds – cut a bit short when a helicopter appeared out of nowhere! (In case you're unaware, you can get thrown in the slammer for such an irresponsible act as aiming a laser at an aircraft. Check out this Philly news item from April 2011:
Man Gets 33 Months for Aiming Laser Pointer at Helicopter.)
Though you can paint with light using a film SLR, the beauty of digital is that an LCD display gives you instant feedback on your technique. You just need to understand LAFS so that you know what you need to adjust to make your next image better! As I was leaving Laurel Hill that night, it occurred to me for next time, why not get a few people with flashlights – and various colored gelatin filters – to bathe a statue in various
colors while I photograph it! Psychedlia!
References and Related Links:
Read about Ed Snyder's book,
Digital Photography for the Impatient
Zen Bojczuk attributes his knowledge of light painting to photographer Harold Ross. View Ross'
"Night Portfolio" on his website.
Learn more about
HDR - "High Dynamic Range"
Man Gets 33 Months for Aiming Laser Pointer at Helicopter


